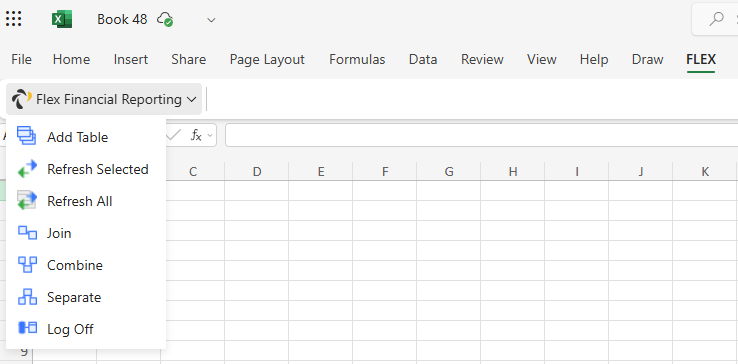
Excel Add-in
The Flex Excel Add-in brings Xero financial data integration directly to Excel. This modern add-in provides powerful data retrieval and analysis capabilities, working across Excel for Windows, Mac, and the web.
Introduction
The Excel Add-in represents the next generation of Flex Financial Reporting, designed for the modern web environment. Key features include:
- Cross-Platform Design: Works across Excel for Windows, Mac, and the web
- Secure Data Access: Enterprise-grade security with encrypted data transmission
- Modern Architecture: Built with modern web technologies for reliability and performance
- Real-Time Integration: Direct connection to Xero through our secure proxy system
Installation Guide
The Excel Add-in can be installed using two different methods. Choose the one that best fits your needs and account type.
Supported Excel Versions
- Excel for Microsoft 365 (Windows and Mac)
- Excel 2021 (Windows and Mac)
- Excel 2019 (Windows and Mac)
- Excel 2016 (Windows only)
- Excel for the Web (Excel Online via browser)
Quick Install (Recommended)
Installation Steps:
- Open Excel (any supported version)
- Click the Add-ins button in the ribbon
- Search for "Flex Financial Reporting"
- Click Add to install the add-in
- The FLEX tab will appear in your ribbon - click it to start using the add-in
Microsoft AppSource Installation
Installation Steps:
- Go to the Flex Financial Reporting AppSource listing
- Click "Get it now"
- Sign in using a work or school Microsoft account
- Follow the prompts — Excel may open automatically or guide you to install via the in-app store
Legacy Excel Add-in
If you need the Legacy Excel Add-in for Windows Excel Desktop, you can download it here.
Installation FAQ
Quick Install is recommended for most users as it:
- Works with both personal and work/school Microsoft accounts
- Is quick and easy to install directly from Excel
- Provides immediate individual access
Microsoft AppSource is ideal for organizations where:
- You have work/school accounts only
- IT administrators want to deploy the add-in organization-wide
- You need to install for specific users or groups
- You want centralized management and deployment
Updates are handled automatically through Microsoft's add-in infrastructure. When we release new versions:
- Most updates will be applied automatically without any action required from you
- Excel will notify you if any manual action is needed
- You can check for updates manually by going to Add-ins > My Add-ins in Excel
Since the add-in is published through Microsoft AppSource, you no longer need to manually install manifest files for updates.
Yes, you need an active Xero account to use this add-in. The add-in connects to your Xero account to retrieve your financial data.
You'll need to authorize the add-in to access your Xero data during the first use. This authorization process uses secure OAuth 2.0 protocols to ensure your data remains protected.
Yes, we take data security very seriously:
- All communication with Xero is secured using HTTPS encryption
- We use OAuth 2.0 for authentication, which means we never see or store your Xero password
- The add-in only requests the minimum permissions needed to function
- Your data remains in your Excel workbook and is not stored on our servers
- You can revoke the add-in's access to your Xero account at any time through your Xero dashboard
Why We Use a Proxy Server
The Excel Add-in uses a secure proxy server to connect to your Xero data. This isn't just a technical requirement - it's a security and performance enhancement that benefits you directly.
Security Benefits
- Token Protection: Your sensitive Xero authentication tokens are managed securely on our servers, never exposed to browser-based vulnerabilities
- Encrypted Transmission: All data travels through HTTPS-encrypted connections at every step
- No Data Storage: We never store, cache, or retain your financial data—it flows directly from Xero to your spreadsheet
- Access Control: The proxy ensures only authorized users can access their own data
Technical Benefits
- Cross-Origin Security: Web browsers block direct API calls to external services for security. Our proxy enables secure communication while maintaining browser security standards
- Automatic Token Refresh: Xero access tokens expire every 30 minutes. Our proxy handles renewal automatically, so you never lose connection
- Optimized Performance: The proxy can combine multiple API requests and handle complex data processing server-side for faster response times
- Error Handling: Centralized error management provides better diagnostics and recovery from connection issues
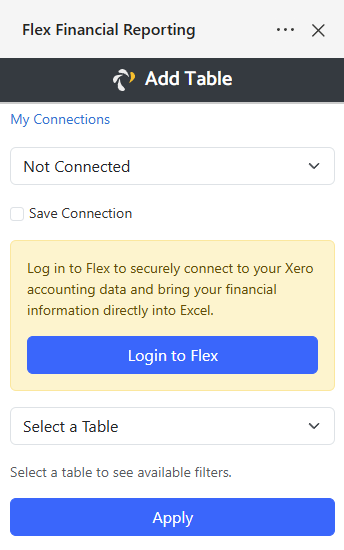
Logging in to your account
The Excel Add-in uses a streamlined web-based authentication system that connects you securely to both your Flex account and your Xero data.
-
Open the Flex Excel Add-in in Excel. Clicking on Add Table, Refresh Selected or Refresh All will open the add-in panel if it isn't already open.
-
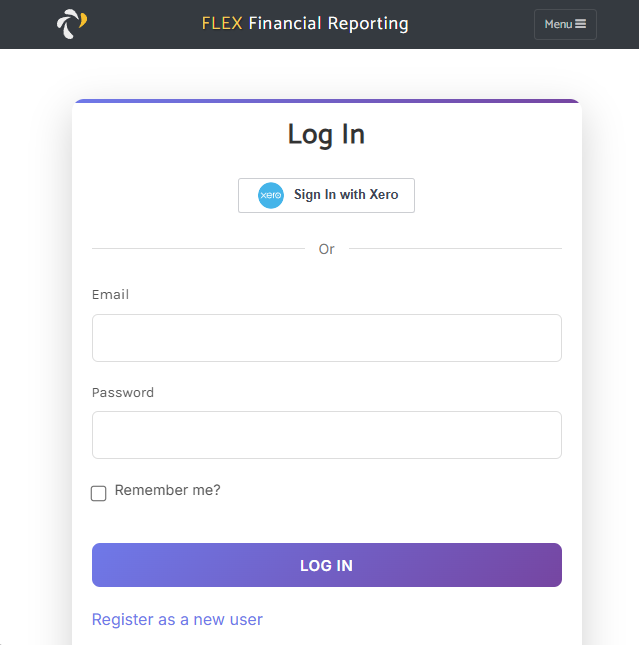
Click "Login to Flex" to begin the authentication process
-
Log into your Flex Account using Xero SSO or your Flex email and password
-
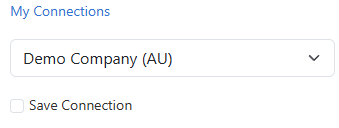
Select your Xero connection from the available list
-
Begin accessing your Xero data through the add-in interface
All subsequent requests use secure token-based authentication
Getting Data
The Xero API is constantly evolving and we regularly update the add-in to support new data types. You can see what data is available via the Xero API by looking at their public documentation here:
Xero API Documentation
If you find some data is available in the Xero API but not in the add-in, send us an email at support@flexfinancialreporting.com and we'll add it in the next release.
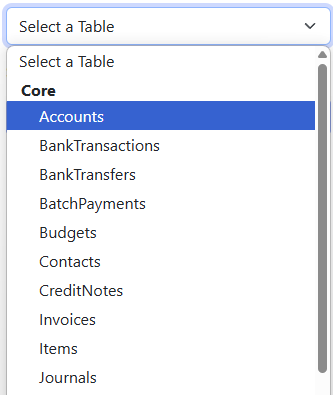
After you have logged into your account and selected a Xero connection, you can click any of the available tables to get data.
Once you click on a table, you will see a filter screen that allows you to narrow down the data that you request (See Table Filters). Some tables may have nested data, for example, Invoices can have Line Items and Payments.
Nested tables will generally show a few key columns from the parent table as well as columns from the nested data, making reporting much easier.
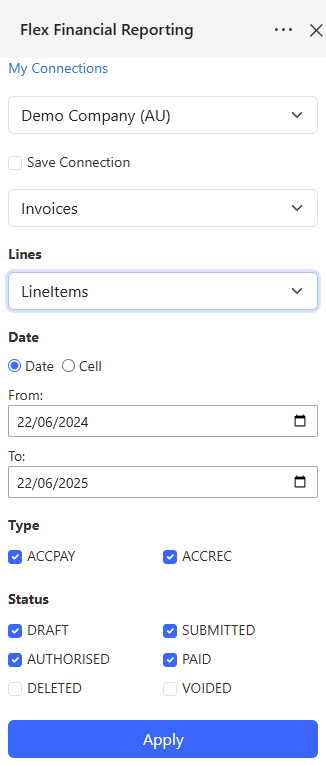
When you click Apply on the filter, the add-in will create a table with your data directly in your Excel worksheet.
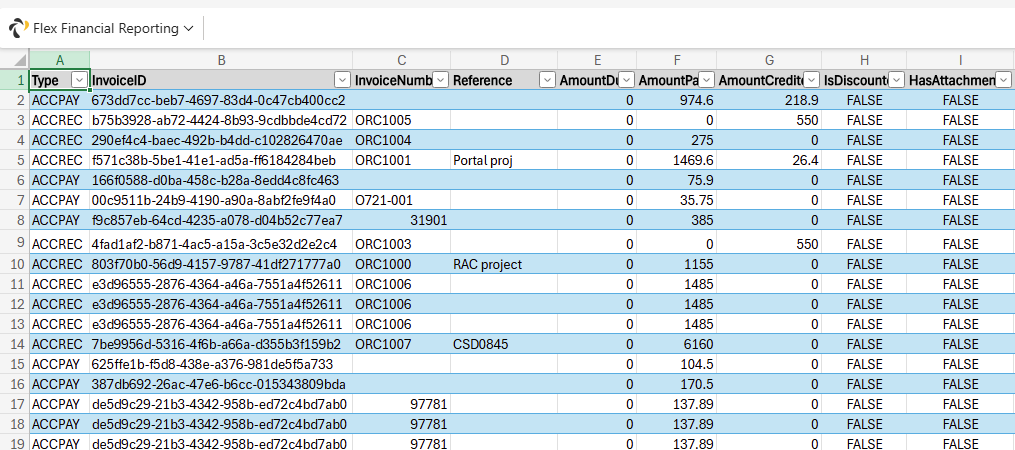
Table Filters
When you select a table, you will get a filter interface that allows you to limit what data you retrieve from Xero. Available filters are determined by what the Xero API supports, so some tables have more filtering options than others.
Many filters allow you to set date ranges, which can be very useful for focusing on specific time periods.
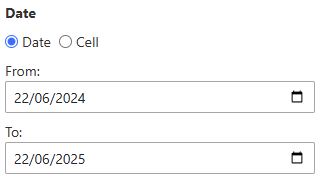
Using Sheet References for Dynamic Dates
When you select the Sheet Reference option in a date range filter, you can specify Excel cells that contain your desired dates.
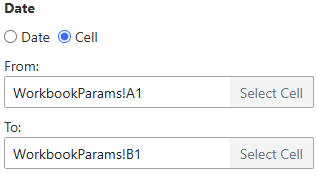
Simply click in the date reference boxes and either type the cell reference (like A1) or click on the cell in your worksheet. The add-in will save these references with your filter configuration.
Save Organization
The Save Organization option works with Refresh All. When enabled, it remembers which Xero organization you had selected when creating the table, and refreshes data from that specific organization instead of the currently selected one. This is useful when you want reports for specific companies and need to maintain data consistency across refreshes.
Column Selection
Column Selection allows you to choose which columns to include in your data tables. When you select a table from Xero, it often contains many columns including both primary data and related information. Column Selection helps you create cleaner, more focused reports by including only the data you need.
Understanding Column Groups
When you select a table, the available columns are organized into groups:
- Primary Table: The main fields for your selected table (e.g., Contact Name, Email, Phone for Contacts table)
- Related Data: Additional information that comes with your table, such as:
- Addresses (Street, City, Postal Code, etc.)
- Phone Numbers (different phone types and numbers)
- Line Items (for invoices, bills, and transactions)
- Balances and other nested data
Accessing Column Selection
To use Column Selection:
- Select any table from the add-in interface
- In the filter screen, look for the "Column Selection" section
- Click to expand the Column Selection area
- Choose which column groups and individual columns to include
- Click Apply to create your table with only the selected columns
The Column Selection interface shows you all available column groups:

Selecting Columns
For each column group, you can:
- Select All: Include all columns from that group
- Select None: Exclude all columns from that group
- Individual Selection: Check or uncheck specific columns within each group
Each group shows how many columns are selected (e.g., "Primary Table (17/17 selected)")
Working with Related Data
Related data columns are grouped by type to make selection easier. For example, when working with Contacts:
- Addresses: All address-related fields (Street, City, Region, Postal Code, Country, etc.)
- Phones: All phone number fields (Phone Type, Phone Number, Phone Area Code, etc.)
- Balances: Financial balance information
Benefits of Column Selection
- Cleaner Reports: Include only the data you actually need
- Better Performance: Fewer columns mean faster processing and smaller file sizes
- Easier Analysis: Focus on relevant data without distractions
- Flexible Reporting: Create different views of the same data for different purposes
Custom Columns
Custom Columns allow you to create calculated fields using Excel formulas that reference your existing data columns. This powerful feature enables you to perform calculations, apply conditional logic, and create derived values without leaving Excel.
Creating Custom Columns
To create a custom column:
- Select any table that contains data you want to reference
- Click the "Custom Columns" button in the add-in
- Enter a name for your custom column
- Write your Excel formula using field references in square brackets
- Click Apply to add the custom column to your table
Formula Syntax
Custom Column formulas use standard Excel syntax with one key difference: you reference existing columns using square brackets around the column name.
[ColumnName] to reference any column in your table. For example, [Amount], [Quantity], or [SubTotal].
Examples of valid formulas:
=[Amount] * [Quantity]- Multiply two numeric fields=IF([Amount]>1000,"High","Low")- Conditional logic=[FirstName] & " " & [LastName]- Combine text fields=ROUND([Amount], 2)- Round to 2 decimal places=[EndDate] - [StartDate]- Calculate date differences
Sample Formulas
The Custom Columns feature includes built-in sample formulas to help you get started:
| Formula Type | Formula | Description |
|---|---|---|
| Simple Calculation | =[Amount] * [Quantity] |
Multiply two numeric fields |
| Conditional Logic | =IF([Amount]>1000,"High","Low") |
Conditional text based on amount |
| Percentage | =([Amount] / [Total]) * 100 |
Calculate percentage |
| String Concatenation | =[FirstName] & " " & [LastName] |
Combine text fields |
| Sum with Condition | =SUMIF([Status],"Complete",[Amount]) |
Sum amounts where status is complete |
| Date Calculation | =[EndDate] - [StartDate] |
Calculate date difference in days |
| Round to Decimals | =ROUND([Amount], 2) |
Round a number to 2 decimal places |
Formula Validation
The add-in automatically validates your formulas before applying them to ensure:
- Balanced parentheses and brackets
- Proper Excel formula syntax
- Valid field references
Best Practices
- Test with Sample Data: Try your formulas on a small dataset first to ensure they work as expected
- Use Descriptive Names: Give your custom columns clear, descriptive names
- Handle Errors: Use Excel's error handling functions like IFERROR() for robust formulas
- Consider Performance: Complex formulas on large datasets may impact performance
- Document Complex Logic: For complex formulas, consider adding comments or documentation
Refreshing Data
Once you've created tables or built reports, you'll want to refresh them with the latest data from Xero. The Excel Add-in provides flexible refresh options to keep your data current.
Refresh Selected
Refresh Selected allows you to update a specific table with the latest data. To use this feature:
- Click the worksheet you want to refresh
- Click the "Refresh Selected" button in the add-in
- The filter dialog will open, allowing you to modify settings if needed
- Click Apply to refresh the table with current data from the selected Xero organization
Refresh All
Refresh All updates all tables in your workbook using their last-used filter settings. Data refreshes from the currently selected Xero organization unless you enabled the Save Organization option for specific tables.
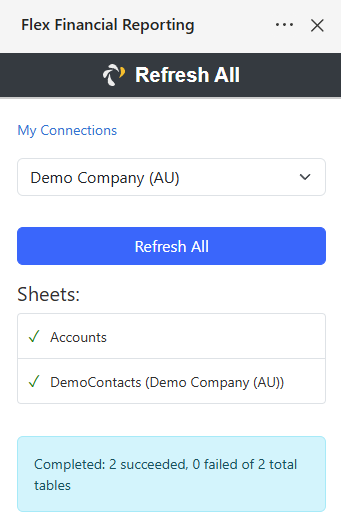
Refresh All processes tables in this order:
- All standard Flex tables
- All Flex Combined Tables
- All Flex Joined Tables
- All Excel data sources (such as pivot tables that reference Flex data)
Join Tool
The Join Tool allows you to connect two tables together and create a new joined table by linking them with matching columns. This is similar to an INNER JOIN in SQL and is perfect for combining related data from different Xero tables.
To use the Join Tool:
- Click the "Join Tool" button in the add-in
- Select the first table and column you want to join from
- Select the second table and column you want to join to
- Configure any additional join options
- Click Apply to create the joined table
The join configuration screen allows you to specify exactly how the tables should be connected:
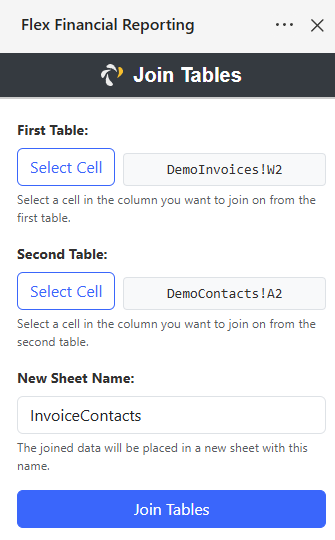
The join tool will create a new table that includes columns from both source tables, showing only rows where the join columns match.
Combine Tool
The Combine Tool allows you to merge multiple similar tables together, appending them vertically and adding a grouping column to identify the source of each row. This is perfect for consolidated reporting across multiple entities or time periods.
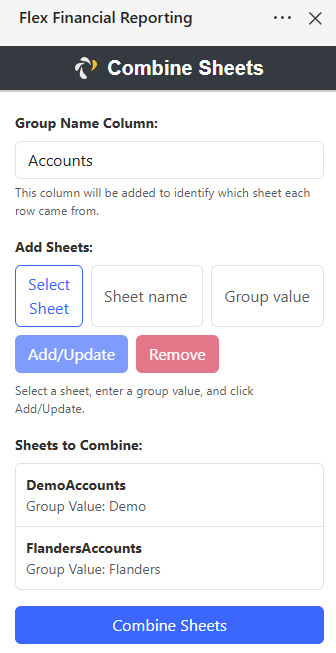
Here's how to create a consolidated report using the Combine Tool:
- First, create two or more similar tables from different Xero organizations (use the Save Organization option to maintain data source integrity)
- Click the "Combine Tool" button in the add-in
- Enter a Group Name (this becomes the column header for your grouping column)
- Navigate to your worksheet and click Select Sheet
- Enter a Group Value (this identifies rows from this table in the combined result)
- Click "Add/Update" to include it in the combination
- Repeat steps 4-6 for each additional table
- Click Apply to create the combined table
Separate Tool
The Separate Tool allows you to split any table based on the unique values in a selected column, creating separate tables on new worksheets for each distinct value. This is useful for breaking down data by categories, statuses, or any other grouping criteria.
To use the Separate Tool:
- Click anywhere in the column you want to separate by
- Click the "Separate Tool" button in the add-in
- The tool will automatically detect the selected column
- Click Apply to create the separated tables
The result shows separated data organized into individual worksheets:
